Friday, April 28, 2017

Grilled Tomato and Pepper Soup

Yum

My Mom created this recipe last autumn when she was inspired to find a way to use the abundance from her vegetable garden at the end of the growing season. She made extra to share with us and it was so good, I had to get the recipe to capture here.

Grilled Tomato and Pepper Soup


Ingredients:

10-12 Roma tomatoes
2 mild green chilis
3 bell peppers

1 tbsp olive oil
1/2 sweet white onion, chopped
2 garlic cloves, minced

1 - 2 tbsp minced fresh basil (or sub 1 tsp dried)
1 tbsp minced fresh oregano (or sub 1 tsp dried)
1 tsp salt
1/4 tsp pepper

5 cups water
1 1/2 tbsp vegetable bouillon (or use 5 cups of vegetable broth)

Directions:

Heat a grill and grill the chilis and peppers for about 4 minutes per side. Cook them until they are just blackened. Then grill the tomatoes for about 6 minutes per side until they are soft and the skins begin to split. Remove the tomatoes and peppers from the grill and cover them so they will continue to steam a little while you begin to prep the onions and garlic.

Heat the olive oil in a large saucepan. Add the onions and garlic and saute until they begin to soften and the onions turn translucent. While your onions and garlic cook, peel the tomatoes and remove the stem end. Then peel the peppers and remove the stems and seeds. Chop the tomatoes and peppers (reserve 1/4 cup of peppers) and add them to the pan. Next, add in the herbs and seasonings (basil, oregano, salt and pepper). Give everything a stir to coat the veggies with the seasonings. Add the water and bouillon and bring the soup to a simmer. Partially cover the pan and let the soup cook over low heat for 20 minutes.

Blend the soup with an immersion blender or process in small batches in a blender (be careful not to burn yourself). Taste, and adjust the seasonings. Add the reserved pepper pieces to individual bowls as you serve the soup. You can also garnish each with a little more of the fresh basil and oregano. This soup is great alongside a garden salad, sandwich, or pasta dish.


Wednesday, April 26, 2017

Veggie Sushi Rolls 3 Ways

Yum

I have been addicted to watching High Carb Hannah's YouTube channel. I found her channel after reading Dr. McDougall's Starch Solution (which is a great book) and appreciated all the high carb low fat recipes she shares on her channel. One video that really caught my eye showed how easy it is to roll your own veggie sushi. I was intrigued and decided I wanted to try it, as we either buy the take-out sushi from the grocery store or go out to restaurants for this treat. My husband and I went to a nearby specialty market for Asian foods and stocked up on rice, nori, sesame seeds, pickled ginger, wasabi, and a small bamboo mat for rolling the sushi. We also picked up a jar of pickled baby lotus root just because it was so beautiful. The shiitake filling recipe came from Connoisseurs Veg's Website, which I just slightly adapted. There are tons of creative vegan sushi recipes out there and Hannah was right...rolling your own is easy once you get the hang of it.

Veggie Sushi Rolls


Ingredients:

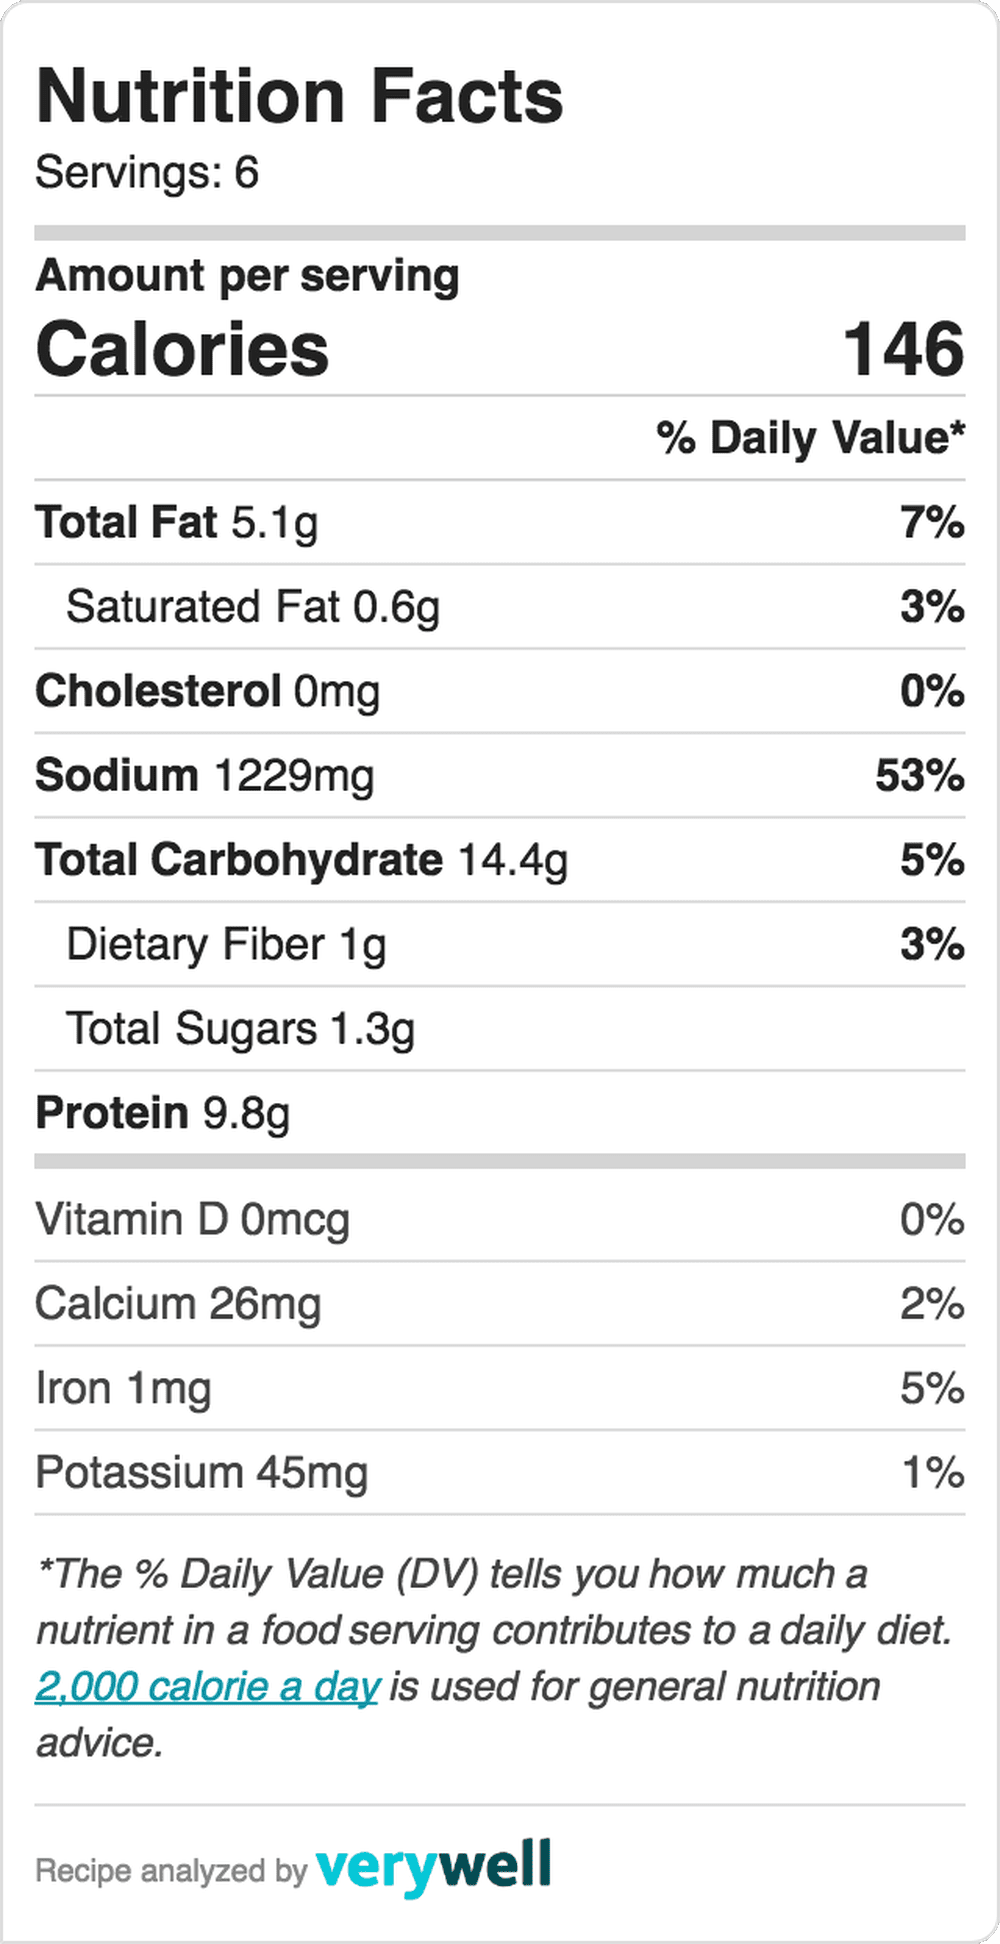
2 cups (dry) short grain brown or white rice
2 1/2 cups water

5 Tbsp rice wine vinegar
1 tbsp sugar
1 tsp salt

6 dried shitake mushrooms
1 cup of water
1/2 tsp sesame oil
1 tsp chili garlic sauce
1 tbsp soy sauce
1/2 tsp agave nectar

3 sheets nori
1/2 cucumber, peeled and sliced into thin strips
1/2 carrot, peeled and sliced into thin strips
1/2 avocado, sliced into thin strips
1/2 mango, peeled and sliced
pickled baby lotus root, optional

Pickled ginger
Toasted sesame seeds
Wasabi
Soy sauce

Directions:

Prepare the rice according to package directions. I cook mine in an Aroma rice cooker and it takes about 20 minutes. First, I rinse and drain the rice 2 or 3 times before adding the 2 1/2 cups water to cook it with. Rinsing the rice removes debris and some of the starch, which makes for more separated grains after it cooks. Then I set the rice cooker to the white rice setting and let it do it's thing.

While the rice is cooking, prepare the mushrooms by cooking them in the cup of water over a low boil for 15 minutes. Then remove the mushrooms from the cooking water (reserve the liquid) slice them and quickly fry them in a non-stick pan with the sesame oil for a couple of minutes. Then season the mushrooms with the chili garlic sauce, soy sauce, the remaining liquid from cooking the mushrooms, and the agave. Continue to stir fry until the liquid absorbs into the mushrooms.

Once the rice is done, fluff it and put it in a large glass, ceramic or wooden bowl.  Sprinkle the vinegar one tablespoon at a time over the rice while mixing the rice gently in a folding motion. Add the sugar and salt and mix to incorporate those as well.

**I highly recommend watching some videos on YouTube to learn about making sushi rice and how to roll the sushi. There are tons of tutorial videos out there to help you get started. Alternately, you can just add the ingredients directly into the rice (after cutting them into bite-sized pieces) with the nori chopped into little pieces and make a sushi salad!

Once the rice is ready, prep your veggies, by thinly slicing the carrot, cucumber, mango, and avocado. The three rolls are seasoned shiitake mushrooms, avocado-mango-lotus root, and cucumber-carrot-avocado rolls.

Seasoned Shiitake Mushroom Rolls
Lay a piece of nori on a bamboo sushi rolling mat on top of a cutting board and spread one third of the rice on the seaweed, then add the mushrooms one third of the way down and roll it up, squeezing it tightly as you go.

Carrot, Cucumber, Avocado Rolls
Then, take another piece of nori and add another third of the rice and spread it around. Then add some carrots, cucumber, and avocado slices one third of the way down and then roll it up, squeezing and shaping it as you go.

Avocado, Mango, and Baby Lotus Root Rolls
Take the third sheet of nori and spread the rest of the rice on it. Add the mango, avocado and baby lotus root (if using) and roll it up again.

Cut the rolls into 6 pieces each, sprinkle with sesame seeds and enjoy with the condiments of your choice.


Monday, April 24, 2017

Smoky Hummus

Yum

Starting from scratch with dried garbanzo beans makes for a creamy hummus, and the seasonings bring a hint of smokiness that is just so good!

Making hummus from scratch isn't as daunting as it first seems....it just takes a little planning. I usually soak the beans the night before I plan to make the hummus. Once the beans are soaked, they cook fairly quickly in a pressure cooker (about 45 minutes total) or take a couple hours on the stove. Once the beans are ready, it is just a quick spin in a food processor (or blender) and voila you have delicious oil-free homemade hummus.

Smoky Hummus


Ingredients:

1 cup dried garbanzo beans or 2 15 oz cans, drained and rinsed (reserve the liquid).

1 tbsp lemon juice
1/3 cup water or liquid from cooking the beans
1/3 cup tahini
1/2 tsp paprika
dash of garlic powder
rounded 1/2 tsp salt
dash of black pepper
1 tsp liquid smoke

Directions:

Soak the dried garbanzo beans in water to cover for at least 8 hours. Cook the garbanzo beans on the stove top until soft, adding water as needed to keep the beans submerged. Or cook the beans in a pressure cooker with 3 cups of water for 30 minutes.

Once the beans are ready, put them in a food processor or blender with the other ingredients and blend until smooth. I prefer making them in the food processor and start them out on low for a minute or two, then scrape down the sides and process them on high for 3 to 5 minutes more. This hummus is great fresh and has a wonderful creamy texture.

Wednesday, April 12, 2017

Nooch Seasoning Shakers (Easy Nutritional Yeast Seasoning Mixes)

Yum

We have come to love nutritional yeast in our house, which is quite a change from back when we first tried it. At first we thought it tasted kind of weird at first but have now completely come around and crave nutritional yeast and add it to all kinds of dishes. My husband had the idea that we should save a spice jar to fill with nutritional yeast for easy sprinkling on pasta, etc. Then we came across these cute little jars and expanded the selection to include a plain nooch shaker, an Italian parmesan flavored one, and a spicy chili mix.

Nooch Seasoning Shakers


Nooch Parmesan Ingredients:

1/4 cup nutritional yeast
1/8 cup toasted nuts or seeds of your choice (hemp seeds, sunflower seeds, and walnuts are all good choices)
1/4 tsp garlic powder
1/4 tsp onion powder
1/4 tsp salt
1/8 tsp black pepper

1/2 tsp basil
1/2 tsp oregano

Nooch Parmesan Directions:

Put the nooch, toasted nuts or seeds, garlic powder, onion powder, salt and pepper in a spice grinder (you could also use a blender) and pulse until the nuts are broken down and the ingredients are incorporated. Then add the basil and oregano and mix to combine. Pour it into a spice jar and sprinkle on pasta, salads, etc.

Spicy Chili Nooch Seasoning Ingredients:

1/2 cup nutritional yeast
1-2 tsp chili powder
1/4 tsp salt
1/4 tsp onion powder
1/4 tsp garlic powder
1/4 tsp cumin
dash of cayenne powder
dash of oregano

Spicy Chili Nooch Seasoning Directions:

Mix it all together and pour it into a clean spice jar and store in a cool dry place. This is great on taco salads, burrito bowls, or on rice and beans.


Monday, April 10, 2017

Vegan Green Chili

Yum

This green chili is so good! It is a top request at my house and we use it to smother burritos, potatoes, on top of mac and cheese, and straight from a bowl. It is rich and savory with the right amount of spice. We buy roasted green chilis in the autumn and freeze them to use throughout the year. You can also buy them roasted and frozen at the grocery store.

Vegan Green Chili

Ingredients:

1 tbsp toasted sesame oil
1 tbsp vegan margarine
1/2 small white onion, diced
1 clove garlic, minced
8 oz cubed seitan

1/2 tsp black pepper
1 tsp nutritional yeast
1/2 tsp dry mustard powder
1/2 tsp oregano
1 tsp liquid smoke

1/2 tomato, diced
24 oz fire roasted chopped green chili (comes frozen in packs)
3-4 cups water
1/3 cup flour or corn starch, whisked into 1 cup cold water until there are no lumps
1 tbsp vegetable bouillon
1 tsp salt

Directions:

Heat the sesame oil and margarine in large pan over medium heat. Add the onion and saute until the onion begins to turn translucent. Add the minced garlic and cubed seitan and cook until the seitan begins to brown.

Add the seasonings next which are the black pepper, nutritional yeast, mustard powder, oregano, and liquid smoke. Stir to coat the seitan and then add the tomato, green chili, water, flour mixture, bouillon, and salt. Bring to a low boil and let it simmer until it thickens up to a gravy like consistency. This is great over breakfast burritos, with beans and rice, or even eaten like a stew.

For 6 - 1 cup servings. Nutritional information from: Very Well Recipe and Nutrition Calculator

Friday, April 7, 2017

Ultimate Vegan Baked Macaroni and Cheese

Yum


I have been tweaking this recipe for awhile, and I know I have hit the mark now because we keep eating the whole pan before I can snap a picture! This vegan macaroni and cheese hits every note I am looking for. It is rich and creamy and gooey (thanks to tapioca flour) it even gets the crisped golden edges when you bake it. It is so freaking good!

Ultimate Vegan Baked Macaroni and Cheese

Ingredients:

1 pound noodles (shells are great, and I really like the brown rice ones because they don't absorb all of the sauce. If you use a wheat noodle, add another cup of water to keep it nice and creamy)

2 tbsp toasted sesame oil (sounds weird but adds a richness that you can't get with other oils)
2 tbsp vegan margarine (Earth Balance is very good)
1/4 cup flour

3 cups soy milk plain unsweetened
1/2 cup nutritional yeast
1/2 tsp garlic powder
1/2 tsp onion powder
1 tsp salt
1 tsp white vinegar

1/4 cup tapioca flour
1 cup of cold water

4 tbsp bread crumbs
salt and pepper

Directions:

Pre-heat your oven to 375 degrees and spray a large rectangle casserole dish with cooking spray.

Prepare the noodles according to the package directions, taking care that they are al dente. Drain and reserve the noodles.

Heat 2 tbsp toasted sesame oil and 2 tbsp vegan margarine in a large non-stick frying pan over medium heat. Add the 1/4 cup of flour and stir to combine and make a roux. Stir and cook this for about 5 minutes, to cook the flour a bit.

Next, slowly pour in the soy milk while continuing to stir to avoid any clumps forming. If you do get clumps, simply press them against the side of the pan and keep stirring. Once the soy milk has been added stir in the nutritional yeast, garlic powder, onion powder, salt, and vinegar.

Whisk the tapioca flour into the cold water (mix until there are no lumps), and slowly add that into the soy milk mix in the pan. Lower the heat and let this simmer for about 10 minutes until it has thickened up and become a bit gooey. Taste, and adjust the seasonings.

Put the noodles in the prepared casserole dish, and pour the sauce over the top. Stir gently to combine and then sprinkle the bread crumbs on top. Finally, add a sprinkling of salt and pepper over the top. Bake for 40 minutes. Let rest for 10 minutes after you take it out of the oven and enjoy!


Wednesday, April 5, 2017

Taco Seasoning

Yum


My son had the idea that I make up a dry taco seasoning spice mix so it would be easy to turn TVP (textured vegetable protein) or Boca Crumbles into tacos. I am so glad he thought of this, because it has turned out to be a quick and easy way to get dinner on the table. This mix lasts for 3 or 4 meals and is easy to store in a small glass jar.

Taco Seasoning


Ingredients:

3 tbsp red chili powder
3 tbsp corn flour
2 tbsp nutritional yeast
1 tsp onion powder
1 tsp garlic powder
1 tsp salt
2 tsp paprika
1/2 tsp cumin
1/2 tsp cayenne pepper
dash oregano

Directons:

Put all ingredients in a small glass jar, put on the lid and shake. Store in a cool dry area.

When you are ready to have tacos, heat a non-stick frying pan over medium heat, add the Boca Crumbles, and 1/2 cup liquid (water, beer, or vegetable broth are all great). Add 2-3 tbsp seasoning mix to taste, then stir to combine and serve when it is heated through and most of the liquid has evaporated.

Monday, April 3, 2017

Golden Milk Chia Pudding

Yum

I have fallen in love with both chia pudding and golden milk. Putting them together makes a healthy combo that can be enjoyed for either dessert or breakfast. I have made this every week for several weeks in a row so finally decided to capture the recipe here.

Golden Milk Chia Pudding


Ingredients:

1 1/2 cups soy milk
1/2 tsp vanilla
scant 1/4 cup maple syrup
pinch of salt
1/2 tsp turmeric
dash of ginger
dash of allspice 1/4 tsp cinnamon

Rounded 1/4 cup of chia seeds.

Directions:

Place all ingredients in a glass jar with a lid and shake vigorously to combine. Let sit in the refrigerator overnight to thicken up.

For 4 small servings.

Nutrition Facts
Serving Size 122 g
Amount Per Serving
Calories
140
Calories from Fat
43
% Daily Value*
Total Fat
4.8g
7%
Trans Fat
0.0g
Cholesterol
0mg
0%
Sodium
88mg
4%
Potassium
219mg
6%
Total Carbohydrates
23.0g
8%
Dietary Fiber
3.8g
15%
Sugars
15.5g
Protein
4.9g
Vitamin A 0%Vitamin C 1%
Calcium 11%Iron 10%
Nutrition Grade B-
* Based on a 2000 calorie diet